Upload Data
Data can be rapidly uploaded into paiyroll® from spread-sheet (workbook) files. These files can be created using any spreadsheet editor. In particular, you will most likely have the required data in other worksheets or workbooks that can reused or referenced. Multiple file formats are supported including .ods, .xls, .xlsx, .csv or .tsv. The following views have an Upload.. button to run the Upload Wizard:
Pay Items
Employees
Pay Definitions, Report Definitions and Workflow Definitions
Pay schedules
Departments
Company
All the wizards follow the same basic steps:
At the bottom of the view, click Upload…
If prompted select the country, then click Choose file to select your file and then click Upload file to server
If your file has a header row, tick the box Skip first row and click Pre-process selected data…
Review what will be uploaded and then click Publish
Your new data is uploaded.
The format of the data varies for each type of view. There is a full guide to the data in each column on each page of the wizard with more help.
Note
The header row is optional for Upload Wizards except for Employees and Pay Items. Where optional, it is not read by paiyroll® and is merely for your reference.
Tip
All data is fully validated before upload. If there are errors, you will need to correct the file and repeat the process. Errors are presented in a similar grid format to the spread-sheet file. Look for the line number where the error was found in the left-most column to identify the line causing the problem. If the cell contains a long error message, you may need to make the cell larger to see the message: carefully position your pointer over the column and/or row separator until the arrow changes shape to allow you to resize by dragging the edge further to the right or down.
More information can be found here Upload Wizards.
Preparing data for upload
Data to be uploaded is often prepared using spreadsheet software such as Microsoft’s Excel or LibreOffice’s Calc. Such software includes powerful capabilities for editing and reviewing data. Consult your product documentation for how to perform common tasks such as modifying date formats.
However, care is also needed to avoid unintended effects such as stripping leading zeros from account numbers and “+” characters from phone numbers, accidentally modifying date formats and so on. Generally, it can be helpful to use a text-based format such as Comma Separated Value (.csv) to review data using a simple text editor.
Leading zeroes can be preserved by adding an apostrophe (’) before a number, or formatting the column as Text.
Note
Using word processing software such as Microsoft’s Word and LibreOffice’s Writer is not recommended as it can also have unintended effects such as changing quotes.
Using .ods, .xls or .xlsx formats
When using .ods, .xls or .xlsx formats instead of .csv, it is important to note that Excel and Calc have distinct display and storage formats for cells and that a successful upload generally requires the storage format to be date (for dates) or text, notably for columns which may be misinterpreted as numbers.
By default, Excel and Calc display text formatted cells as left-justified. Excel (but not Calc) displays green warning marks on corrected cells:
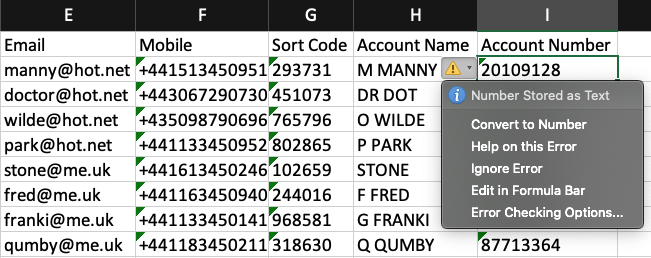
Hint
Excel and Calc display potentially problematic cells as right-justified by default. To correct the storage format use and select text. Another option is to use the TEXT function e.g. =TEXT(‘Induction Bonus’!A2,”0”)
You may also encounter Excel precision issues with extra decimal digits. If so, there are 3 solutions:
Save as CSV.
Use the ROUND() function.
Use Excel Set precision as displayed option (
Configurable Employee lookup
Several cases require that each row in an uploaded file identifies an Employee. This is normally done with the username, but in some cases it is possible to use alternative methods based on how the VLOOKUP() spreadsheet function works:
Works id: To use this method, you must include a header row and the first column heading must be the exact string
works_id, and all employees must have unique works id’s across all client companies, e.g. ensure you don’t have employee works id no 1 in two companies. The system does not enforce unique works ids across companies.Full name: To use this method, you must include a header row and the first column heading must be the exact string
full_name, and all employees must have unique names across all client companies, e.g. ensure you don’t have more than one John Smith. The full name must be used including all forenames, middle-names and surnames as entered in the Employee view e.g. John Adam Smith. The system does not enforce unique names across companies.Name: To use this method, you must include a header row and the first column heading must be the exact string
name, and all employees must have unique names across all client companies, e.g. ensure you don’t have more than one Smith, John. The name format uses the surname, then a comma, then forenames “surname, forename(s)” e.g. Smith, John Adam. The system does not enforce unique names across companies.Username: This is the default method, and the fall-back in all other cases, including no header row. Usernames are guaranteed to be unique across companies.
Caution
Usernames may be modified by employees or administrators. Therefore it is the user’s responsibility to verify the username in uploaded files.
Pay Items
The file requires that the first three columns are:
Employee using configurable Employee lookup.
Pay Definition name
Pay frequency m1 for monthly, w1 for weekly, w2 for two-weekly and w4 for four-weekly. m3, m6 and m12 are available. Only if a client has one pay frequency across all companies, can this column can be left blank.
The remaining columns are used for the values of each input using numbers or words. For example the value of a salary or the name of a scheme. Each Pay Item therefore uses 3 standard plus as many columns as input values.
Note
The system will also accept the internal long-form Pay Definition column of the form: Client\;Company;PayDefinition - where the the Client name is followed by a slash and a semicolon, the Company name and Pay Definition name are separated by a semicolon .
Examples
Below is an examples using different Pay Definitions. Each of which have the three standard columns plus a single input value column:
Example Pay Item workbook¶ works_id
Pay Definition
Frequency
Bonus
1234
Bonus
m1
400
1651
Overtime
m1
321
1652
Overtime
w1
98
Tip
A single file, or single sheet can contain different Pay Items. If using workbook with multiple sheets, you may wish to use each sheet for different Pay Items. On upload, you can select which sheet to import.
Below is a more complex Auto-enrolment (AE) example with 3 standard plus 10 input value columns:
Example AE Pay Item workbook¶ works_id
Pay Def
Frequency
Tax relief
Overseas
QE
Worker %
Scheme
Migrated status
Refund
Opt-out
Migrated enrol
Opt-in
AE
w1
5
NEST AE
Auto enrolled
2020-07-01
Here is an example payitems.csv file which can be downloaded. Add new rows for each Pay Item using the headers as a guide.
Note
One way to quickly identify the required columns is by looking at the Pay Item in the - after the standard 3 columns, the value columns follow the same order as shown in the Pay Item editor gird.
To upload the Pay Items:
Go to Pay Items
Click Upload…
Click Choose file to select your file and then Upload file to server
Tick the box Skip first row to skip the header row if you are using a header. Then click Pre-process selected data…
Review what will be uploaded and then click Publish
Tip
If you select Employees and Pay Items in Payroll Debbie and choose Download, an example Pay Item CSV file will be created for you.
Shift Data-feeds
Shift type Pay Items which use the Per Unit Pay Template can be uploaded using a Data Feeds. Pay Item upload is a 1:1 upload whereas a Upload Shift CSV Data Feed is more powerful in that it is able to:
Automatically use sequentially numbers Shifts. For example if you have workers with multiple shifts, then their first shift would be added as Shift 1, the 2nd as Shift 2 up to as many Shifts are you require.
Automatically construct the ‘Display-as’ input from any column in the source CSV file. For example you can combine hours, rate and location from three different columns 3 hours @ 10.50/hour - Leeds
Handle errors such as Shifts for missing employees. All shifts for valid employees will be uploaded, but missing employees will be marked as an error. In contrast, as Pay item upload will not import any Pay Items if there is even a single error.
Tip
You can use the Per Unit Pay Template for different Pay Items. For example Bonus, Overtime, Expenses etc. can all be uploaded in a similar manner to Shifts by using 1 as the 2nd input. You will need a separate data-feed report for each type along with matching Pay Definition(s).You can omit the shift number {shift_number} if you plan to only have one instance.
Employees
Employees can be uploaded from the employee view or using a Data Feeds. Employee upload is a 1:1 upload whereas a Upload workers CSV Data Feed is more powerful in that it can also automatically add in default Pay Items for example. Both use the same employee fields.
Specification
The specification for employee upload and Data Feeds is here gb_workers_upload_spec.csv.
Example
Here is an example employees.csv. Copy the file and add a row for each employee using the headers as a guide. To upload the employees:
Go to Employees
Click Upload…
Select GB and click Choose file to select your file and then Upload file to server
Make sure you tick the box Skip first row to skip the header row and click Pre-process selected data…
Review what will be uploaded and then click Publish
Important
If state is to be uploaded, a heading row is required.
Your new employees are uploaded.