Follow this guide if you need to import companies where YTD year-to-date values and prior RTI Pay IDs are not available from a Full Payment Submission FPS XML.
Note

This procedure is only suitable for starting from the beginning of the tax year in April.

Your paiyroll® account needs template companies: 0 Template monthly company, 0 Template weekly company, etc., with the "0" at the beginning to keep them conveniently near the top of the list. These template companies will allow you to upload data very quickly. Without suitable pre-configured templates, you will not be able to follow this procedure. These templates will set all employees as Existing employees, thereby not sending starter declarations. New RTI Pay IDs will be generated and not linked to previous Pay IDs
1. Create a Company #
- Top menu Tools > All Tools > Company create or copy Create a new company by copying an existing one > Run
- Select the required template company, which will be the 2nd or 3rd in the list
- Leave other options with their default values
- Select the Frequency (when the template company has one frequency, but not used if multiple frequencies exist, e.g. weekly and monthly)
- Create company
Click Companies in the left menu to see the newly created company named Test Company:
- Click Update towards the right
- In the Main tab, enter the Legal name
- In the Postal tab, enter the Address
- In the Tax tab, enter the new company details
- PAYE Reference, Accounts Office AO Reference
- The company’s last re-enrolment date – this will be the date of the first hire if it is a new company
- Update
Top menu Setup > Schemes > Update the company pension scheme and enter as applicable to allow the pension to operate automatically:
- Scheme Reference number
- Type (RAS for NEST)
- Prp alignment Tax or Calendar
- Postponement (set all 3) – None for all if no postponement, or Maximum for 3 months
- Group
- Payment Source
Only if necessary, or if you need to amend the Pay Schedule dates:
- Top menu Setup > Pay Schedules
- You can adjust pay dates by updating the schedule
- If you make a change, you’ll need to go to Pay runs, click Redo and delete the older dated pay run
Your company is now ready, a pay run will be running, and you will have a Test worker who will be used to donate pay items when you upload employees..
2. Export an employee file from your current payroll system #
This will vary by system. For example, in Capium, it is Manage Payroll > Employees > export employee CSV
You will have a file called something like Employee.csv
3. Upload employees #
Click Data feeds in the left menu and select your company, where you will see a list of all Data feeds.
To save time, you should configure the Data feed to add all required standard Pay Items from the Test Worker:
- Click on the name of the e.g Capium Employee CSV upload
- Scroll down to Add from and select the test worker to choose a valid choice
- Update
Now upload your employee file:
- Click Upload next to the required e.g Capium Monthly Employee CSV upload
- Choose the employee file you want to upload
- Start
- After a short while, your data will be uploaded
Your employees will be imported and can be viewed or updated in the +Successes or Employees left menu.
Add any missing employee information:
- Director
Once you have confirmed that all your employees have been correctly imported, you can:
- Delete the test employee by first changing their name to delete, cannot be undone.
- You can also delete the data feeds in Setup > Report Definitions> Select your new company > Delete > Capium Monthly Employee CSV upload
4. Pay Items #
Click Pay Item Editor in the left-hand menu:
- Select your Company
- Select an employee
Check the PAYE Tax code: click Show statutory Pay Items and scroll down to the PAYE Pay Item:
- Tax code and
- Effective date
- You can enter these later via HMRC DPS, or enter them now.
Update Pension Auto Enrolment:
- Click +Create Pay Item to add an AE Auto Enrolment Pay Item – this will automatically add all the required statutory pay items (hidden)
- You must enter the Migrated status and Migrated date for each employee’s Auto Enrolment Pay Item. The example below, Robinson Crusoe, was Auto enrolled on 2024-06-01
- Click Update/View Payslip to commit the change
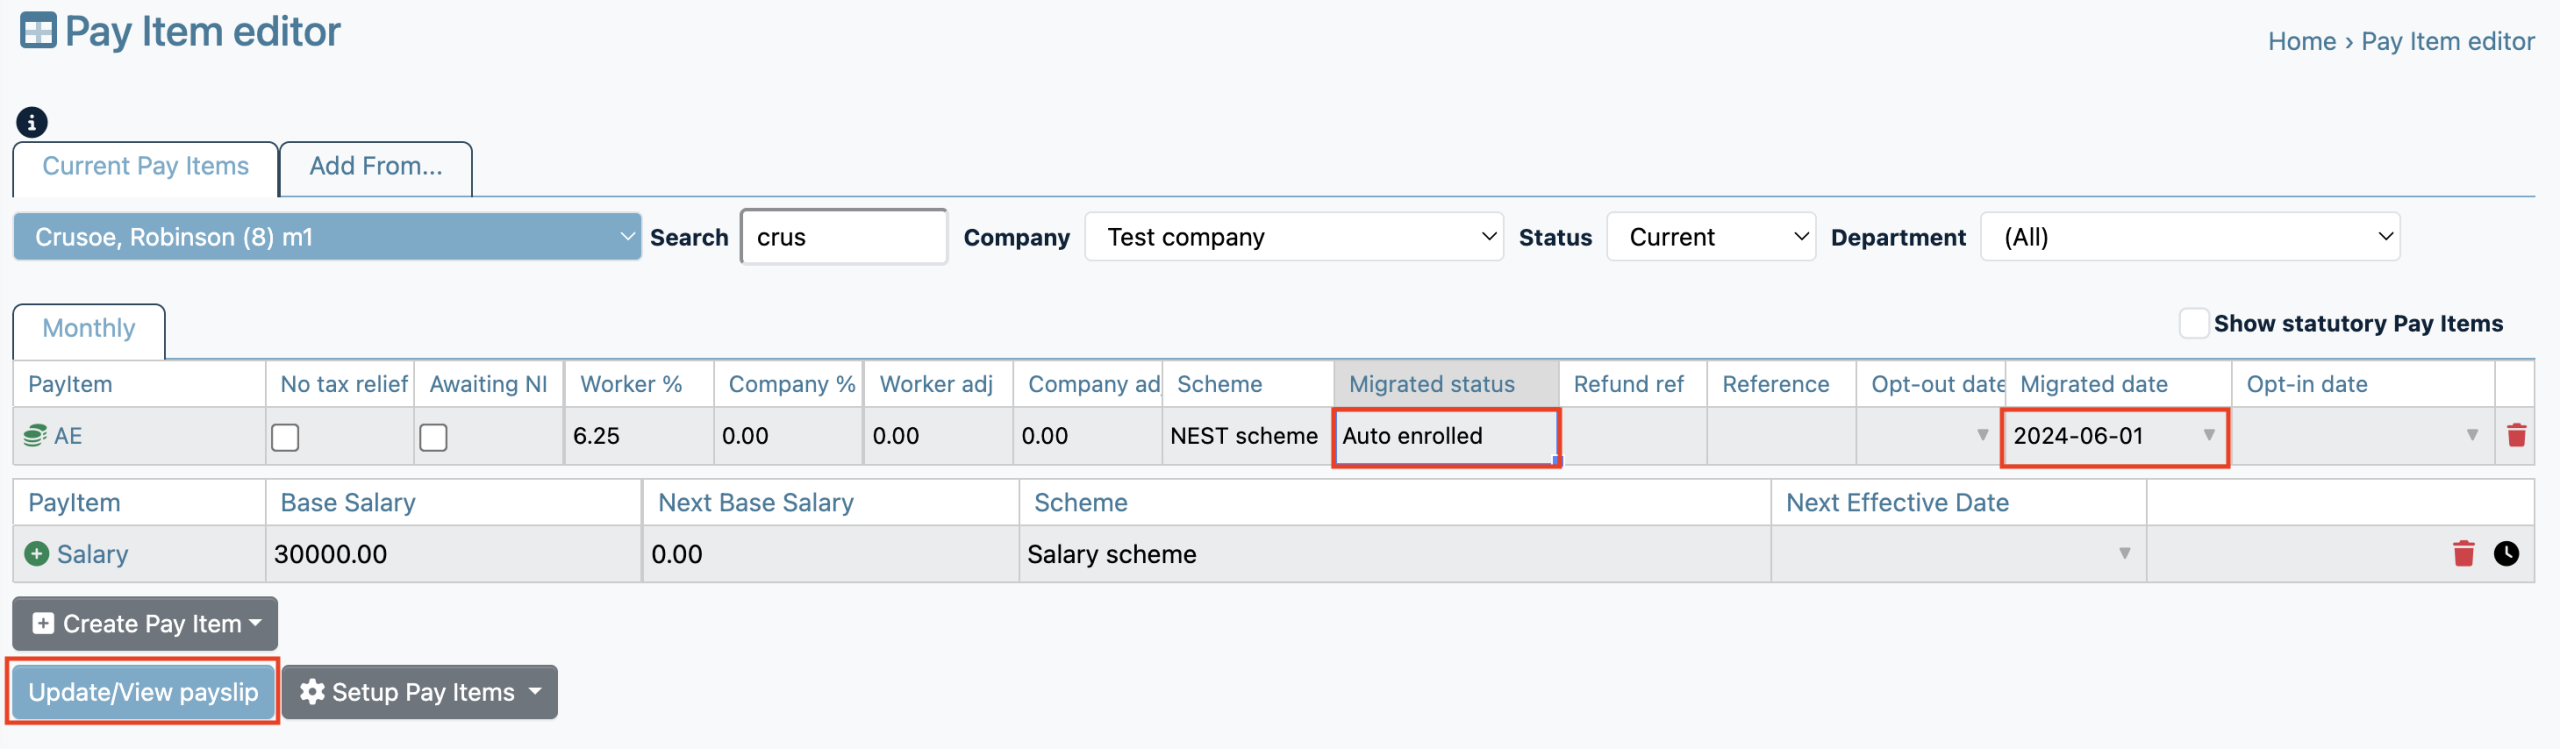
- Opted-out employees will also need the date they opted out in Opt-Out date
- For Deferred employees, enter their postponement date in the Migrated date
Next, you will create the required pay item for the employee:
- Click +Create Pay Item to add a required Pay type, e.g. Salary, Hours 1 or Payments are typical
- Enter the values in the Base Salary, Base/Hours, or Base Payment cells
- Click Update/View Payslip
- Repeat until all employees have the required pay
5. Redo Pay Run #
In Pay runs, click Redo and wait for it to finish.
6. Documents #
All documents will then be ready in Documents.
Proceed to make changes and redo the pay run until everything is correct.
You only need to proceed with the following steps when ready
7. Credentials, Tax codes, Pension and Bookkeeping integrations #
- Search “Enter Credentials” to learn how to add credentials
- Collect Tax codes in Data feeds by clicking Refresh next to GB HMRC DPS
- Search “NEST API” to set up NEST pension integration if required
- Search “Setting up Xero integration” if required.
You will need to click Pay run > Redo if you make any changes above, and also, for example, to see the effect of new tax codes.
8. Self-service #
All documents are made available by secure self-service.
Search “Welcome” in Help > Support to invite employees to log in and view their documents.
Bureaus can also grant a privileged employee, e.g., a manager or director, access to company documents – search “Make Company Documents visible to clients or privileged employees“.
9. Approval #
Search “Approve a Pay run” when you are ready to finalise and submit.
The next pay run will start automatically.