Follow the 3 steps in this guide to set up a fully configured integration that will post journals automatically upon pay-run approval.
If you only need to refresh an existing report definition Token, start at step 2.
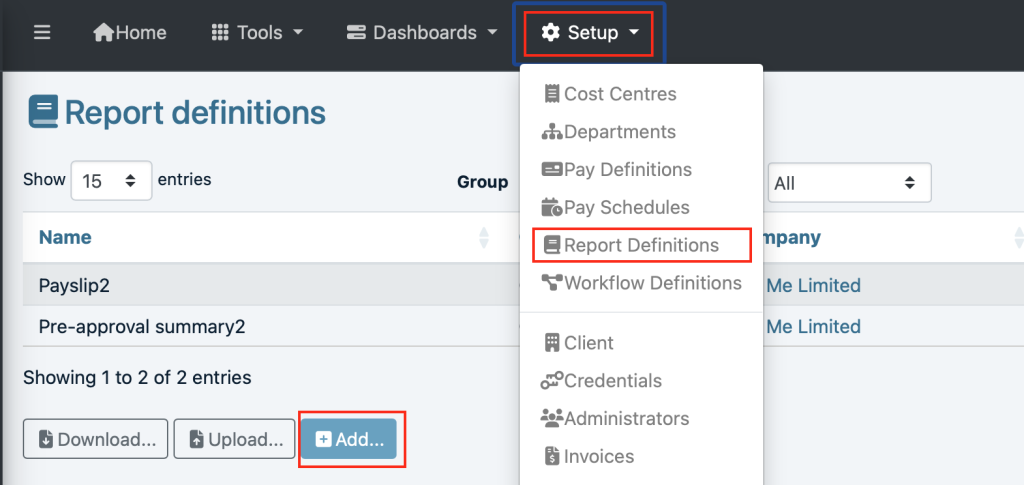
1. Add Report Definition #
After logging in, from the Home screen:
- Setup > Report Definitions
- Scroll down to the bottom and click +Add…
On the Create Report definition view:
- Select the Company
- Select the Template for GB Xero Journal (scroll all the way to the top in the section GB – Accounting)
- Scroll down to the bottom and click Add

The Xero Report Definition has now been added.
2. Grant #
After adding the Report definition, the 2nd step requires you to Update it and Grant Access.
- You would normally be on the Report definitions view, if not, then Setup > Report Definitions
- On the GB Xero journal row, click Update
- Click Grant…

Next, you will need to log into Xero:

You will likely be asked to authenticate your login via your phone.
Select the organisation in Xero you wish to allow access to, and then click Allow access

Set Organisation #
If you are a bureau and have multiple companies, you must set the Organisation in paiyroll® to match the Xero organisation.
A single-company employer will use the default:

Update #
We recommend clicking Update to save the Report definition at this stage.
3. Configure the Journal Mapping #
After granting the Report definition, you can proceed to the 3d step and Configure the Journal. A default mapping is already available to get you started; in many cases, you may be able to use this without modification, and this step will not be required.
In other cases, depending on how your Xero accounts have been configured, you may need to change or configure the Journal mapping to map between Xero and paiyroll® as described in this section.
- You would normally be on the View Report definitions, if not, then Setup > Report Definitions
- Click Update
Your account codes and account names will be downloaded from your bookkeeping system. To configure each journal’s Debit and Credit line:
- Select the relevant Pay frequency tab – for example, m1 (monthly) below
- Notice there are 2 different Add buttons at the bottom of the Debit and Credit accounts.
- Add a new journal row entry in either Credits or Debits using the row along the Add button:
- Select the Account (e.g. 900 -Deductions).
- Select the Narrative. The Narrative includes all Pay Definitions and all Busses. You may wish to select a single Pay Definition, but at other times, it will be more convenient to select a Buss that includes all Pay Definitions connected to that Buss. (In our example below, we select DWP DEA.
- Click Add.
- Sometimes it will be necessary to switch plus values to minus and vice versa by ticking the Negate box, as some values are negative and some positive. In this case, click Negate:

After configuring the journal mapping, click Update to save the changed configuration.
Delete Unused schedules #
You should delete any unused schedules by selecting the schedule and clicking delete:

Verify the journal operation #
Once you have set up the Xero integration, you should verify that everything is working correctly with an interim pay run:
- Pay runs (left main menu)
- Pay run Redo and wait a few seconds until the Approve button changes from Wait
If everything is correct and the journal balances, meaning it can be posted successfully, no errors will be displayed.
To see the actual data that will be posted as a journal,
- Pay runs
- Click View on the Pay run to see the pay run view
- Select the Reports tab
- Click View on the GB Xero Journal
- The Balance, debits, credits and line items will all be displayed:

Each time you do a pay run redo, all the Xero journal items will be recomputed and available for you to see.
If there is an error, now or in the future, and the journal does not balance, you must identify the cause and reconfigure the journal mapping using the above steps. See this section on journals.
Payrun Approval – Posting to Xero #
The payroll journal will not be posted to Xero until the Pay run is approved.
When you have completed all payrun pre-approval checks and you are certain everything is correct, follow the usual steps to approve the pay run:
- Pay runs > Approve
- Yes: Approve as final (no updates were made after previous pay run)
- Tick Confirm
- Click Done
After a short while, the next Pay run will start.
Your journal has been automatically posted to Xero! This will be visible in Xero and the approved pay run.
Revoking Access #
You can revoke access at any time from paiyroll®:
- Setup > Report Definitions
- Update the GB Xero Journal
- Click on the Revoke button
- After you have revoked Access, the Revoke button will be greyed out. This will confirm that the connection is no longer active.
- Once you have revoked access, the report will be inactive, and updates will not work. Continue by clicking the Home icon or your browser back button
You can also revoke access from Xero:
- Company > Settings
- Connected apps
- Click Disconnect
Troubleshooting #
Missing Accounts #
If you find the specific account has not been downloaded, this may be due to not being configured correctly in the bookkeeping app. We recommend you correct this in your bookkeeping application and configure the account as a credit or debit and re-grant.
How to add a new Xero Credit account #
Below is how to add a new account code 5310 – ensure you select Current Liability Account Type:

Alternatively, you can type the account in manually (but if you do a re-grant, you will lose it next time). If you need to expand the window to see and edit the accounts, click and drag down the control in the corner to resize the accounts window. The example below shows where to resize and how a new account has been entered (noting the separating semicolons).
; 4445 - Others debtors